Today, almost any camera, from mobile phone cameras to professional cameras, brings a panoramic function. But, for some reason, novice or amateur photographers seem to have difficulty taking good panoramic photos with this feature. They are always twisted, shaky or cut. At that point, our friend Photoshop can solve the problem. See how:
Before we start
- This tutorial will use Adobe Photoshop software.
- In this article.
- The tool names correspond to the English version of the software.
- You can also watch our other tutorial with Photoshop.
- Which teaches you how to reduce the effect of blurry photos.
- See here our article: How to reduce the effect of blurry images with computer software.
The idea of this tutorial is simple: take multiple separate photos, then combine them into a single panoramic photo using Photoshop. You can use the automatic “merge” tool or do so manually with the “Clone Buffer” tool. Since automatic tools generally don’t work perfectly, let’s combine the two techniques.
prep
The first step is to take the pictures. Unfortunately, it’s not just about taking pictures, you must meet certain requirements to make sure the end result of your panoramic photo is the best possible.
First of all, you will need a landscape with a clear view, without great obstacles like trees or people, think of it this way: in a panoramic photo you focus on the horizon, if there is something very important in the foreground, it will become a photo of ordinary landscape.
You’ll need a tripod to place your camera, if you don’t have one, try another stable support object, such as a box, it’s important that you can rotate your camera through this object, another detail that requires your attention is that the camera should be aligned with the tilt of the horizon to the right or left. Otherwise, you’ll get some angular distortion.
Take the pictures
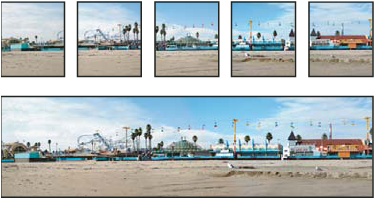
Turn the camera to the far right and start taking pictures. When shooting, turn the camera slightly to the left. Approximately 7 photos, with an angle difference of 20 degrees between each, should be enough to get a good panoramic photograph. But it depends entirely on your instinct as a photographer; you can even create a 360-degree panoramic photo.
An important tip is to remember to name the photos according to the order in which they were taken, so your work in the next steps will be easier.
? Join? Automatic
After downloading the photos, open Photoshop, now comes the automatic part of the process. Go to the File Automate Photomerge menu.
A new window appears, with two columns. The layout is set in the first column and you can choose different modes to adjust the final result. In general, the mode that works best is Auto. La second column is where you place the files to merge; you can select an image group or an entire folder. After making adjustments to both columns, check the option “Mix images?”and click OK.
Checking the result
After you click OK in the Photomerge window, Photoshop will automatically adjust the images to form a panoramic photo. But you’ll probably notice that this photo won’t be a perfect panorama, the photos won’t be fully aligned. This often happens when we can’t perfectly align the camera when shooting.
Fixed angle
There are several ways to correct this imperfect alignment in your panoramic photo. The easiest way is to use the “Trim” tool. Select the Crop tool in the sidebar and select parts of the photo. Then slightly rotate the selected area to place it perfectly horizontally. Save and repeat the procedure with the next part of the photo.
Disguise imperfections
In doing so, you’ll notice that small white areas of the background will appear between the parts of the photo, as well as in the corners, are imperfections that you should cover.
To do this, create a new layer over all others; you can call it “Parameters”. Then select the “Clone Stamp” tool. Is it very important that the “Sample all layers” option is checked?
When you find an empty space, press the ALT button and click a very nearby area, which will be used as a fill reference. Then release the ALT button and start painting the blank space. Don’t forget to paint only in the Settings layer.
The final touch
Now go to the layers window, you may have noticed (probably) that all layers are in a folder, turn it into a single layer. Now you have a great panoramic photo, in large format, that can be used for posters, banners and various graphic media. You can also use Photoshop to add all kinds of effects, filters, and even text to your panoramic photo.
If you liked this tutorial, you can see the full version (with photos) on the TutsPlus website.