You may be wondering: what is it? No, it’s not about getting to the broom and doing a sweep while doing the Saint-Guy dance, even though it’s called scanning, no, it’s not with the broom and, once that’s cleared up, you’ll wonder again: what is it then?? Well, it’s about following a moving object or subject with your camera to get a photo where the background shakes while the moving object or person appears sharp. You’ve certainly discovered it, but as an image is worth a thousand words, here’s an example:
What’s great? Now, what do you want to get an image similar to this one?Well, you’re in the right place. Today’s article tries to explain how to achieve this, of course I warn you that it is not an easy task, it takes a lot of practice (and patience) and I do not say it to discourage you, on the contrary I tell you so that you start knowing that it is a challenge, because we love challenges, motivate us, help us learn and grow, right ?, well, said that, take pencil and paper (or what is it , Be careful?) We will proceed with the explanation as simply as possible My challenge is to make sure that when you finish reading this, you go out on the street to do a sweep or chase your pet around the house, because you need to know that you don’t need a Formula One car to sweep ?!
- Each element that moves.
- From the bike to the cat.
- To a swing or a tennis ball.
- Because a snail moves and won’t do you much hehe.
- Nor a turtle.
- So I better clear up and tell you that you can do it with something that moves more or less fast.
You should keep in mind that the fewer moving elements you have, the clearer you will be, this does not mean that it is more or less correct, it will depend on the result you want to achieve, if you include, for example, people, when you use slow speeds, you will also capture their movement, which does not mean that the image is not worth it, I give you two examples so that you see the difference and see that both situations can offer interesting results. advice, I’ll tell you to try to get away from cars because it’s the most used resource, and you want to take different pictures, don’t you?Of course they can be used to practice, for that they are very useful.
You should also keep in mind that the movement should be as straight and homogeneous as possible. A jumping kitten or a bicycle doing “S” can give you more than a headache!
The type of background you should look for will also depend on the effect you want to get, the smoother the background, the less drag you will get on the scan, and the more items there are, the more drags there will be. it’s you, I show you the options, you choose the colors from the palette ?. As before, it’s best to look at it with an example. Yes, I use a car again, but on the web that’s what dominates the most!Is that why I encouraged you before I put a touch of originality?
Where not to be run over?. Jokes aside, you will have to place yourself in a place where you can follow the movement of the element in parallel, imagine a trail of breadcrumbs on the ground, think about the movement you do with the broom, well because something similar happens here, the crumbs would be the path that represents your object or subject and the broom would be you with your camera (but without actually touching , hehe). To make you understand better, I’ve made you a little diagram. the image will help you clarify what I’m saying.
This is very important, because if you don’t follow the object with your camera to the sound of its movement, we wouldn’t talk about scanning, no matter how much you get a blurry background photo.
You will need a camera that allows you to make manual adjustments, with a compact one will be much more complicated, the only way would be to open the shutter more, compensate for the exposure or photograph in a dark place. automatically understands that you need to expose more time to capture more light.
The ideal way to do a scan is to use a telephoto lens, which doesn’t mean you can’t do it with another type of lens, but will make things easier for you.
A tripod will help you, it is not essential but it can give you a hand in tracking your mobile element and will give you stability You will have to block the vertical movement and leave the horizontal free (unless you are playing Newton and pretend to photograph the law of gravity, in which case you will have to do it the other way around?).
You won’t think of running this technique automatically because you won’t get much worthwhile results. Use manual mode or speed priority mode. Set an average speed between 1/20 and 1/60. With very fast speeds, you can only freeze the whole scene and if you use very slow speeds you will get the opposite, everything will be moving, in any case it is very arbitrary. Will it depend on your camera, your position, the light?Here are some settings to start practicing and, from there, adjust depending on the conditions you have and the result you expect. Keep in mind that the faster you move, you can use faster speeds and the slower you go, the slower the shutter speed will have to be in your camera. And he also thinks that the longer the placement time, the harder it will be to make your protagonist accurate. But you know, it’s all about practice!
You’ll work at slow speeds, which means the diaphragm will be open longer and collect more light, which means that if it’s a very sunny day your image is probably overexposed, i. e. burned or too lighted. solve this problem in two ways, the first using a large depth of field (the number “f” of your camera). The background will be less blurry, but in a scan, it’s not serious. The other option is that if you can choose when, enjoy a cloudy day or avoid the central hours of the day, where the sun hits harder, you can also make them at night, here’s a good example:
You might think I’ve told you a lot of things, and I haven’t told you how to take the picture yet, have I?Well you’re right you know the above, when, where and settings, now you should know that when you’ve identified your moving element you have to focus on it, shoot and follow the path of movement with your camera, you don’t stop until you’re sure your camera’s diaphragm is closed, what will it be when you hear the second click?.
I know it’s enough to focus your attention on scanning and do it right or the best you can, but if you also manage to make a good composition, your image will gain a lot, you don’t need to place your object in the center of the image, as it will probably lose interest. Remember, for example, the laws of the three-thirds and the appearance. You can check them here.
Analyzing Exif data at home, that’s an ugly word, I know, but these are just the settings with which the photo was taken, so you can have an orientation for the next time you go out looking for scans. the data that gave you poor results and the data that helped you get the image you wanted, so you know where to start next time.
Try both manual and speed priority mode. You’ll learn sooner and get better results by testing and seeing how it works best.
To scan it is important that you take a comfortable position, which allows you to move freely in the same direction of the object or subject and with the same speed.
Don’t forget the creativity, we have already commented that there are many equal sweeps, in fact the galleries are flooded with car scans, try to be original and look for less seen patterns, around you there are many things that move, look for interesting backgrounds, change of perspective?
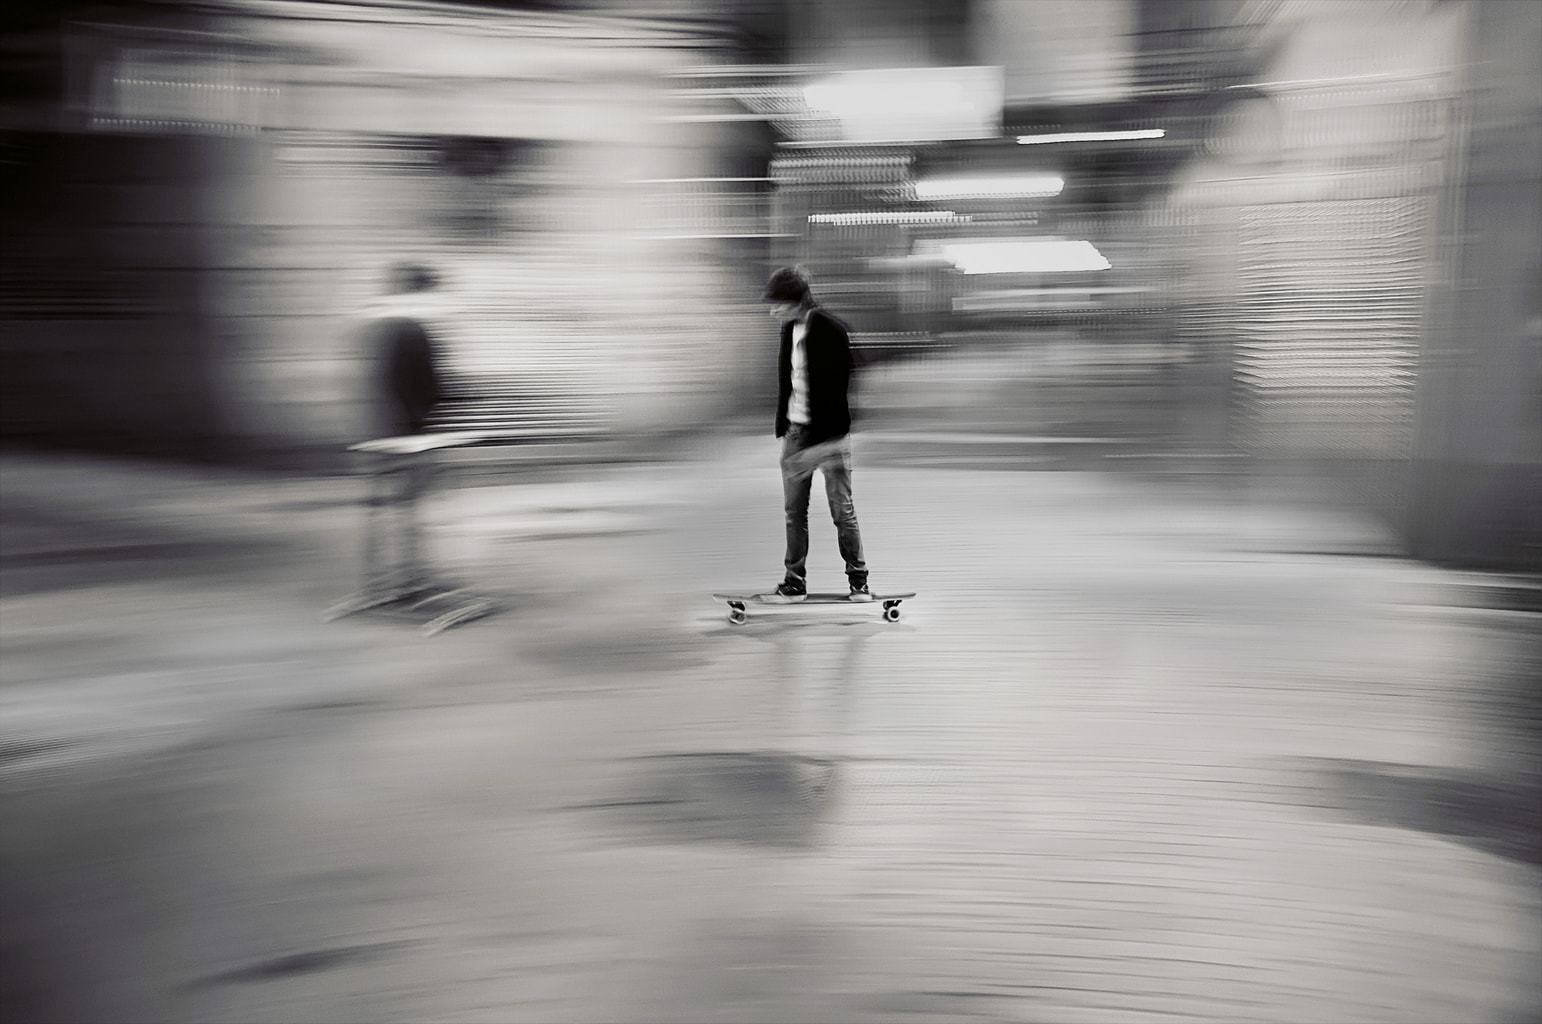
You can also transmit sensations, look at the following image as the feeling of speed is improved with a small tilt of the camera. Looks like the man’s going downhill, which makes us feel like he’s going even faster, don’t you think?
And the last and most important advice, in my opinion, is not to throw in the towel the first or second time, you will have to photograph many times, every time it comes out better and with practice, you will learn to look for the best. Patterns, the best backgrounds, do you know what image you can get and adjust the settings without having to shoot thirty times ?. Photography, like other disciplines, is like that, you have to train a lot to master it, sometimes it’s not an easy task, but when you get it is so rewarding, you feel so good that all the effort will have been worth it. .
If you liked it I ask you to share it on Facebook, Twitter or Google , I will thank you and surely you will also make someone happy with these new tips. Thank you very much and see you next time!