The photography is light. As a photographer, with your SLR camera in hand, you have 3 factors that you can play with to get more or less light in your photography. In the previous article, Alexa explained what the steps in the photograph were, we saw that we could increase and decrease the light by playing with aperture, shutter speed and ISO sensitivity.
But, if any of these 3 factors allow the light to rise or fall, which one should be affected in each situation?
- Although the aperture.
- Shutter speed and ISO.
- The 3 allow to raise and lower the light.
- Do not do it in the same way.
- Do not offer the same result.
- And each of them carries certain “side effects” that is necessary Therefore.
- If you need to increase or decrease the amount of light in a photo.
- Depending on the situation.
- Only one of these 3 factors is ideal.
How do I know which of the 3 (speed, aperture, ISO) to play?
I’ll talk about it below. It will be a very detailed article, with many explanations and examples, so give it the reading it deserves, with a good cup of your favorite drink Do you feel comfortable and upset?
Photography has to do with balance. You need to get the necessary amount of light but enough. Capturing little light would affect a very dark and underexposed photo. On the other hand, passing the light would result in an overexposed result too bright, and we don’t want that. either.
To understand which of the parameters should be touched according to which situation, it is advisable to first review the 3 elements or commands that intervene in the exhibition.
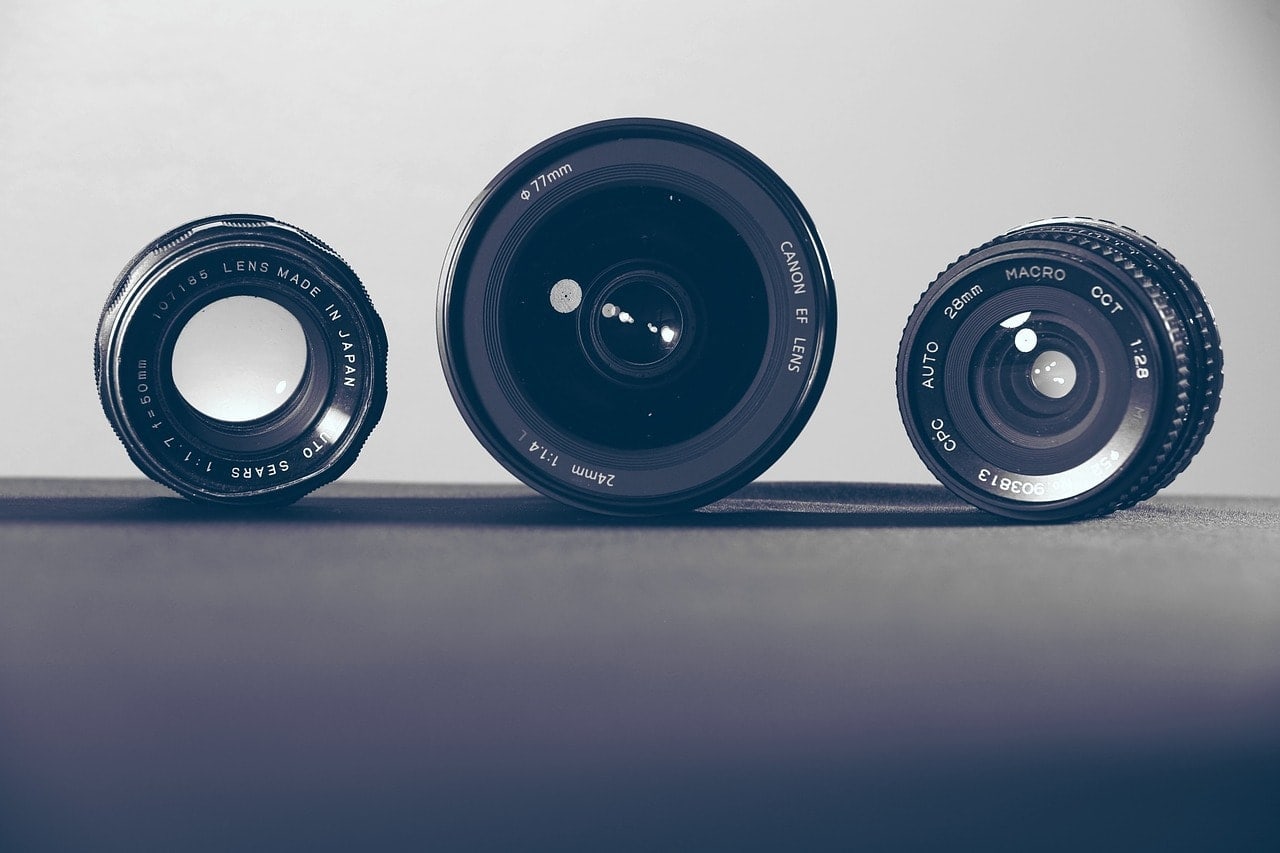
This is the diameter of the lens opening, where the light passes. The larger the aperture, the more light comes in. It’s like a faucet or hose, the larger and wider the flow, the more water there is, the smaller it is, the less water passes and the less light enters the photograph. Here’s an example of 3 goals. The one on the left has a very wide opening; the one on the right, a central opening, and the central opening is extremely closed.
The aperture is expressed with the symbol f /. Be careful, don’t be fooled by the number, as it usually expresses a value in the other direction. F/1. 4 symbolizes a very large aperture (one that would let in a lot of light), while f/16 represents a very large aperture. small opening (which would barely let the light pass).
In my camera I see the opening here where I point it in the image, in yours this should be more or less a style.
It is simply the speed at which the camera captures the image. If we choose a very fast speed, we will obtain a photograph with a minimum of light. If we use a slower speed, our photo will have more light. Again, think about the water tap. You get less water in the glass by turning the tap on and off immediately than by turning it on and off after a few seconds. In photography, it is exactly the same. The water is light. If the speed at which the shutter opens and closes is slow, a lot of light passes through. If this speed is so fast that before the shutter finishes opening it is already closing, will almost no light pass through? The shutter speed is expressed in seconds and fractions of a second. A shutter speed of 3 seconds would be expressed like that, with the number 3. If we put it for half a second, we would see it in the camera as 1/2. A tenth of a 1/10 of a second and a fraction of a 500 of a second would appear like this 1/500. For example, a photo taken at a 1/500 shutter speed is much faster than a 1/100 shot, so the former captures less light than the latter. What do we lack light with the 1/100? We slowed the shutter speed even more and tested 1/50; 1/5, even 1 second, to see what happens. And so on until we have enough light.
Here you can see how he puts it on my camera. I have the shutter speed set here at 1/500. As you can see, my camera shows the 1 / and only shows what comes next. In this case, it shows me 500 referring, to 1/500.
This is the sensitivity of the sensor to light. If we take the photo with a very high ISO value, for the same aperture setting and shutter speed, the camera will capture more light. A lower ISO (is it male or female ISO?Well, there I leave them) would give an image with less light, ISO is also expressed with its corresponding number and usually goes from 100, an ISO of 100 is considered very low, 1000 would already be a relatively high value.
Now you know exactly what aperture, shutter speed, and ISO are for. You even know which direction you need to move each of these settings to get more or less light.
But wait. If you can control the amount of light you capture with your camera by simply playing with shutter speed, then why bother using the other two settings?ISO, opening? By simply controlling the shutter speed, you should be able to adjust the amount of light you need. Sets a slow shutter speed and a period. Instead of a speed of 1/800, for example, it reduces it to 1/200 and that’s it. , what is not enough? You make it even slower, 1/2 What else do you need more light?You shoot it at a speed of 1 second, 2 or even 10 minutes if you feel like it. God, can you imagine how much light could capture his camera by leaving the shutter open for 10 minutes?Who wants to play an isO or isis opening?
If I can control the light with one of the 3 settings we’ve seen, why do I need the other 2?
When I quickly explained the shutter speed, aperture and ISO in this article, I omitted a very important part of the operation of each of them, namely the side effects. Please do not get on camera to practice these settings without knowing these side effects. . There they are.
Shutter speed gives you more or less light, accompanied by a certain effect, that may or may not interest you. Now let’s see. With the opening the same thing happens, when changing its values you may have more light, but this has some effect that in turn can be useful or not, if you think the same thing happens with ISO, and that when changing its values to have more or less light, we would end up having a side effect, are you right?
Shutter speed, in addition to the light problem, influences sharpness and freezing, or blurring and blurring of the image.
As we said at the beginning, a slow speed would bring us large amounts of light, that is true, but it would also cause a rather shaky or blurry image. If we use a slow shutter speed, and during shooting the subject moves (even slightly) or if we move with the camera, say goodbye to the photograph, when trying to correct the light problem we could find ourselves in a new problem, which is the blurry or shaky photo, in what situation could we increase the light by slowing down Reduce the shutter speed and make sure that the photo will not be blurred?Simply provide total stability to both the subject and the camera. A subject standing or in a difficult posture will be more likely to vibrate or move, while if he were sitting, lying down or leaning comfortably against something, it would be easier for him to stand still during filming. The same for the camera, if you leave it on a good tripod, well stabilized, it is normal that it does not suffer much movement.
Now that you know, use the shutter speed to increase the amount of light in the photo only when you are sure the subject and camera will remain still during the shot. If you do not have this guarantee, if you have no way to stabilize the camera, or if what you intend to photograph is precisely a subject (or object) in full motion, I recommend that you leave the shutter speed aside for a while and try to increase light by other methods.
Which one? We still have two left
Large aperture, remember, that would be a high f / value. Let’s put ourselves in a situation: we have before us a spectacular landscape (like the ones we explain how to capture in our landscape book), which cries out to be immortalized for later. You take the camera out of your backpack, frame, focus and take photos. Wow, underexposed photo. You look at the aperture settings and see that the value is f / 11. Hmmm? It’s a very small aperture, I can increase it and that’s why I capture much more light ”, you think. Just a moment. You are in front of a landscape and you are interested in focusing the whole photo. You are not trying to show the beauty of a particular poppy, or a room, no, no, you want to depict a beautiful panoramic landscape, so you want everything to be in focus. If you increase the aperture (by reducing the f / value of your camera to f / 3. 5, for example), you will encounter a new problem called depth of field. Relax, don’t be afraid of the term. I have an entire article dedicated to explaining what depth of field is, but in short, it is the width or narrowness of the area of focus. Have you ever seen a photo where the object or subject is sharp, while things behind it, in the background, appear blurry and out of focus? These are photos where the depth of field is very small. There, we intentionally asked the camera to focus on a particularly small area, that of the subject’s face or the object in question. There we were interested, but here, in front of this great landscape, we want precisely a very, very wide area, so we need a great depth of field.
Returning to our landscape, if we expand the diaphragm (reducing the f/ value), we will also reduce the depth of field, we run the risk that the camera will focus only on the grass in the front, and that the trees in the background, mountains or clouds seem blurry.
Are you following me more or less?
In other words, increasing the aperture will give us a lot of light, but as a side effect, it will reduce the depth of field, if we are not interested (as this time), we have to look for another solution.
IsO is wonderful, you know? Increasing it allows your camera to capture more light. That’s great. In addition, this does not make the photo look blurry or blurry as with the shutter speed. This also does not change the depth of field, so you can be sure that the focus area of the camera will not change, regardless of the settings. , ISO is not PARFAITE. It must have had an inconvenience, and that’s the noise. Look at this picture. It’s full of noise, it’s this kind of grain that occupies the whole image, especially the dark areas, you see?
This noise is well known and is the direct result of the use of a particularly high ISO. I have to say that the ISO generates more or less this noise problem depending on the camera. If you’re photographing very low ISO, for example 100 or 200, it’s normal that you don’t have any noise, but if you need to increase this value, you’ll start noisy in your photo depending on the camera you’re using. In some older ones, you’ll start to see a noticeable noise of ISO 600 values. In other cameras, more modern or more sophisticated, or simply more professional, you can walk quietly in ISO 1200 and barely notice the noise.
As you can see, each of the 3 elements (speed, aperture and ISO) has a side effect that can hinder us to a lesser or greater extent, this should not assume any limitations. On the contrary, it offers a “wealth” since depending on the situation you can increase the light thanks to speed, aperture, or with the ISO configuration. As we see fit.
The first few times you have to deal with situations of lack of light, you have to think a little and experiment until you find the settings that interest you the most, of course they can take 5 minutes to come out with a decent photo (but hey, we love photography, right?) Over time, you internalize certain situations and you already know almost unconsciously if you need to change the aperture, speed or ISO value.
This is my personal method, in case it inspires you
1) Shutter speed: When a photo is underexposed, shutter speed is usually the first point I check. If I have a tripod, or at least a stable surface on which I can stabilize the camera, and if my subject can be still, make sure I will play with the highest possible shutter speed to get that amount of light. What I need.
2) Opening: The aperture in my case is second, if what I want is to increase the light, I only change the aperture when the shutter speed does not work for me (because I do not have tripod for example or because it is a photo with a lot of movement). The reason that openness is a second resource and not the first is that, although it is easy to get more light by increasing the aperture, I lose focus, if what I want is to focus only the subject and everything else is blurry, no problem, but if what I want is to have a general approach and everything is clear , openness limits me.
3) ISO: this is my last resort. I have the camera set to ISO 100, a very low value (so I have the least noise possible). I always leave it at that and I don’t change it, unless I don’t have it. The speed does not help me, nor the opening, is that the ISO can increase a little. If I get the photo with the amount of light I need, I’m satisfied, even if the photo contains noise. I prefer proper exposure, photo but with a little noise instead of a photo without noise but totally underexposed, dark on the other hand, in computer science, during post-processing, there are ways to eliminate noise or at least reduce it without altering the image quality in the slightest.
In conclusion, I use this or that scenario depending on the situation, the type of photo I want to achieve, the amount of elements (main and secondary) that I want to have in focus, the availability of a tripod or not, etc.
Here we leave it for today. I hope this reading was helpful to you. Practice is the only way to turn this reading into something useful. Where did you leave the camera?
Oh, and if I can ask you a favor, I’d really appreciate it if you’d share this article in your circle of contacts on Facebook, Twitter or Google.
Good photography and let the light be with you!?