This is the question of many beginner photographers and even those who are already engaged in the profession. Depending on how you use these tools, the quality of your photo can vary from mediocre to excellent. There are several tips, but we’ve selected the main ones, one and one way you understand without having to read, reread and kneel in complex photography tutorials that don’t say, say and explain anything. So let’s get started!
You’ve probably heard of the famous ISO (International Organization for Standardization), or you may have seen it in your camera settings, but at first it’s really hard to understand its effects on the image. However, there is no mystery, ISO in digital. Photography is the sensitivity of the sensor, and the lower the sensitivity. This means that much more light is needed for the photo to be sharp. The normal is ISO 100, but you can adjust it to suit your needs. of the image you want to capture.
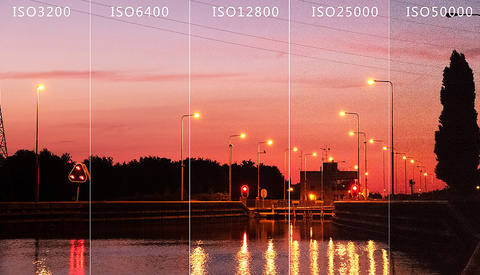
ISO LOW
WHEN TO INCREASE ISO
In short, a high ISO is used in low light conditions, but be careful not to increase too much to the point where a lot of noise appears in the photo.
Shine
The flash can save or ruin a photo, know how to dose it and when to use it is an excellent act of wisdom for a photographer. The flash is usually small and emits a large amount of light, resulting in direct, hard and shaded lighting. But calm down, the important thing is to know when you can use it and what to do when you need it.
No flash
The famous ones? In the photos, which no one likes, it is due to a misuse of the flash. Avoid using it directly on the human face.
With flash
The next and most important tip is to practice, only then will you know when it is the right time to use all the tools of your camera, for this compare photos of the same objects, with high ISO, low, flash and without flash. and intuitively understand which settings are best for the type of photo you want.
Follow our website and stay up to date with many other tips and information for better photos!