Have you become trapped in the world of black and white and don’t know how to get out of it?Or have you just landed and would like to know how to edit your image beyond putting the default filter offered by your smartphone?Do you have Lightroom? Well, you’re in the right place, because today’s article will easily explain how to convert photos to black and white, can we see it?
Obviously, the first step in converting photos to black and white is to choose the candidate image, for this remember the importance of searching for images that are not backed by color, and with an adequate composition and exposure.
- Similarly.
- I highly recommend that.
- If you are thinking of converting images to black and white.
- You always do them using RAW format.
- This format is the one that retains more information about the tones.
- Shadows and lights of the image.
- So it will give you images richer in nuances and.
- Ultimately.
- More richness and matter with which to work the corresponding settings.
In this case, we will work with the following image in RAW format
Basically, you can convert in 4 different ways:
In the basic editing settings, Ligthroom offers us the monochrome change by simply choosing the black and white option in the basic settings panel.
As you move the saturation cursor to the left, all colors will lose saturation until they reach gray, white, and black.
In the basic settings panel, you’ll find a subsection named HSL, which controls the hue, saturation, and luminance of each color in the image.
Or presets, these are automatic ways to convert black and white photos of different styles, some very contrasted, some less, some with more or less texture, light, etc.
Before I start detailing each of the parameters I would like to advise you or comment on some points, the first is that there is no right or wrong way to develop images, the development always goes to the taste of the consumer, that is to say of you and that clean and personal style that you will acquire over time.The second is that once familiar with each of the scenarios, it establishes a workflow to develop the images, that is, you work in an orderly and logical way when it comes to editing your photos.So you take advantage of the time and minimize errors ?.
The basic parameters of reveal are those that control mainly the lights and shadows of the image and, therefore, other aspects such as contrast, whether semitones or extremes, so knowing how to read the histogram of the image will be of great help as a starting point during the development of our photograph.
Quickly, we can say that the histogram is divided into three zones: the one on the right corresponds to the light tones, the midtones, the midtones or grays, and the left area, the shadows.The charts are concentrated, we will know if you have a correct exposure or if it is over or underexposed.Ideally (except for scenarios with very extreme lighting), the information is distributed throughout the histogram, i.e. it has a wide dynamic range or details in all display areas.
When we work in color, this is where we correct the color temperature, that is, when you’ve been taking indoor lights with light bulbs all your life and you’ve noticed that all your photos are orange, can you come and fix By moving the cursor to the right, you’ll go to the warmer tones (orange), and move the cursor to the left , towards the cold tones (blue).In black and white, the movement of the cursors also affects the To learn how to see the characteristics of each of the basic correction settings, it is better to touch the cursor back and forth.Don’t worry, you can always go back. This way, you can better understand each of the parameters.
The hue dyes the image in different shades ranging from magenta to green and also affects black and white photography.Unsurprisingly, each of the grays is the translation of a color. If you place the cursor to the right, you’ll see the image light up.and on the left it gets dark. Personally, I don’t usually use temperature or dye to work with black and white because I think both aspects can be worked with other parameters like lights and shadows or saturation of different colors, but maybe it’s up to you, about tastes, you know?
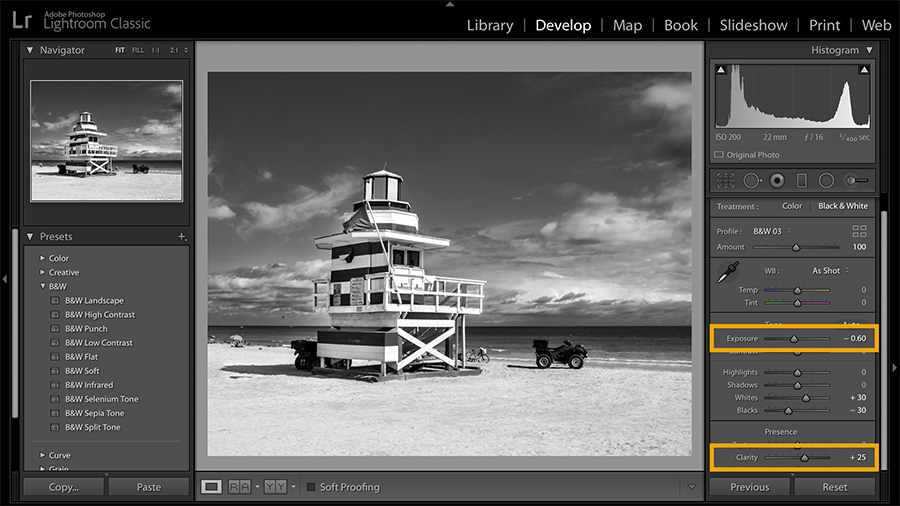
Although we follow the same order of Lightroom’s interface so as not to get dirty, I always recommend leaving the exposure for the end, several times adjusting the highlights, shadows, black and white, the exposure is automatically corrected, however, it is a very useful tool to add or subtract a certain degree of light in the image.
Accentuates the intensity of black and white in the image
Change the right area of the histogram; which corresponds only to the high lights of the scene, leaving the rest of the image unchanged.It is very useful for correcting scenes with some areas too exposed.
Same as the highlights but for the left area of the histogram.Correct shadows, lighten or darken them, and leave the rest of the image with the same exposure.
Adds or subtracts the target from the scene. For a scene to have a good range of colors, it is interesting to note that the information it contains ranges from pure white (255,255,255) to pure black (0.0.0), so the image is richer in nuances.With this cursor, you can “force” the image to reach these two extremes
Add or subtract black from the image
Now, how do you know if the image has pure black and white or not?No need, Hightroom has a great way to find out.See the following screenshot. Two arrows appear in the corners of the histogram.Each corresponds to the shadow zone (left) and lights (right). When activated it shows us areas where the image loses information or what is the same, where black and white are pure.Adding a little pure black and white to your image will improve the contrast and richness of the tones of the image.
Añade contraste sólo en los tonos medios de la imagen.
Intelligently intensifies tones with lack of saturation. This is very useful for scenes with “deafened” midtones and is also more subtle than saturation.
Intensifies all shades in the same way
Another way to control exposure values is to use the tone curve, either by directly changing the curve or with the lower sliders.
Sólo con los ajustes de exposición y contraste puedes convertir tus fotos a blanco y negro. No obstante, tienes más controles si lo que quieres es obtener control total sobre cada uno de los matices de la escena. Veámoslos.
Although Lightroom often offers automatic conversion with its own interpretation of translating tones to gray levels, it’s best to control every tone in your image.This mixer will be very useful for lightening or darkening areas of the image with a specific color hue.(for example, darkening a sky, lightening a face, contrasting certain areas of the image that have apparently been translated in a similar way, etc.).
For example, the faces are usually quite red and yellow (depending on the original color of the person represented, of course).With these two cursors you can play lighten or darken, for example, only the face of the person represented.
NOTE: To leave the sliders at zero, simply double-click each slider.This will also help if you have manipulated a cursor and decide to return to the original configuration.Simply double-click the desired location and automatically return to the original Value.
Finally, I advise you to take a look at the “Detail” section, here you can correct both the noise and the lack of sharpness or focus.To adjust this setting, don’t forget to scale the image 1:1 before you start working with the settings so you can observe the changes in detail.
This is the conversion I achieved, although are there as many options as photographers in charge of editing the image?The trick is to try to find a style with which we are satisfied.
Finally, I leave you with a video by Joan Vendrell in which she converts a completely different image to black and white with the same tool.
I hope this article on basic Lightroom settings for converting black and white photos was helpful.If so, share it so that other people can enjoy it too.Thank you very much and see you next time?