The photos are first taken with the eyes and then, through the camera, immortalized on paper (or in a digital file). The difference is that the vision has no limits set (or ignored) while the cameras do and these limits, called limits, will be the setting for all your photographs.
The way you use this limit when it comes to framing (composition) your photos can radically change the sensations that your photos convey, so knowing the secrets of framing becomes almost an obligation.
- In the article I will tell you not only what the framings are and the different types of these.
- But you will also learn in what situations it is practical to use one or the other to improve the messages and sensations they transmit.
- Don’t miss this!.
The frame, in photography, refers to the part of the scene that you will use as a photographer for your photographs, that is, what proportion of the scene you will capture in a photograph, imagine the frame as the scenario where your photos are taken.
Framing is a fundamental element in the construction of photographs because the edges of the photo, almost always rectangular, exert a great influence on its content and on the messages and feelings they convey.
Wither way you use the edges of the frame to distribute the elements (composing) within it will give strength or not to your photos, make the most of the framing will depend on two things: the first, your knowledge of composition and the second, the experience you will live from photo to photo.
Basically, there are three ways to frame
Distinguishing different forms of framing doesn’t mean devaluing one method over another, chances are that, depending on each situation, you’ll use one or the other method, depending on the possibilities allowed by the type of photography you’re taking.
In nature photography, for example, it is more important to be able to take a picture of this rare species of bird than to worry about framing it before taking it or reframe it afterwards; in fact, in animal photography, the vast majority of framing is later done on the computer.
As you walk through the viewfinder, you’ll notice how countless possible photos begin to appear, which will be more or less attractive depending on how you frame them.
Depending on the elements you want to include in your photo and how they relate to the edges of the frame, they will have a greater or lesser influence on the final image.
Remember that, as I told you in the article?16 ways to highlight your subjects ?, the eye of the observer always seeks to be guided through a photograph: the framing and lines, explicit or not, will mark the way to follow through the eyes while strengthening the messages. and helping to better convey sensations.
Pay attention to the following examples
The way the elements were arranged in the frame is not coincidental: the horizontal edges and vertical lines contributed strongly to the final design of the photographs, generating a greater impact on the viewers.
To do this, photographers Mikel Ortega and A. González-Alba used both the side and diagonal edges and the angles that form between them, in order to generate tensions very attractive to the observer.
See the following photo
As you can see, it is the same situation as in the example of the red cap fisherman, but this time the frame used was different, in this case the parallel lines of the ground and the cane relative to the edge of the frame. don’t generate as much attractive tension as in the example above. If you realize, not only have I changed the way I enjoy angles, but also, the author, opted for a different framing format: the square.
As you’ve already seen, the edges of the frame and the proportion of them have a great influence, not only on the shape that the final photograph acquires, but also on the sensations it generates in the viewer.
The frame format separates the image from everything around it, i. e. framing it, so you can control its composition, depending on what you want to convey, one frame format can help you do more than another. frame format?
While photos can be worked to gain a depth impression, they have only two dimensions: height and width. When we talk about the proportion or format of the frame, we mean precisely the relationship (mathematical) that exists between height and width. width of the frame.
Surely thanks to your photographic eye and your aesthetic instinct, without realizing it, you will have noticed that, in some situations, it is more aesthetic to take a photo with vertical orientation and in other situations, with horizontal orientation.
The orientation of the framing is just that, the vertical or horizontal orientation that you will give the frame (your camera and its sensor) when you take your photos, then we will stop to see each of them:
Horizontal framing: Depending on how the elements present in a given scene are intended to be arranged, a horizontal orientation can be more effective than a vertical one: if you want to convey a sense of stability or, the elements to be represented are arranged horizontally, the ideal is to use this orientation because it is very comfortable during composition.
If you look closely, monitors, TVs and a lot of other visual media around you are oriented horizontally. This orientation is probably the most common, as the camera sensor is oriented in the same way, so it is the most natural position when shooting.
Vertical framing: This type of framing, unlike the previous one that provides more stable images, gives more strength to photographs whose elements also respect this orientation, such as a portrait (people are larger than wide).
If you pay attention, to the vast majority of magazines, advertisements and everything fashionable, this type of orientation is the one that is most used.
The decision to take one direction or another will depend on the message you want to convey with your photos, when you use one or the other it will depend essentially on your experience as a photographer, so the more photos you take and the more time you spend analyzing the results. , the better the decisions you will make. As an exercise, I recommend you practice the different orientations in the same scene and then see how one or the other works in the eyes of the viewer. Of course, before recommending check out the following article: “9 tips and tricks to improve your photographic composition”.
Pay attention to the following photo: How are you feeling?
The key when selecting a framing is: balance. Getting balanced photos is what will motivate you to choose one or the other frame, always, depending on the situation you are trying to photograph and the elements you want to use in your photos. , always keep in mind that balance depends on you: dare you break it?
As the name suggests, is the crop one? Technique ?, which refers, once the photograph is taken, work it on the computer or in the studio to get the desired framing, that is, the photograph is taken first, then the best frame is sought.
Although multiple views can be taken in the same scene, clipping refers to cropping once the photo is taken, below you will see how from a single shot, made by photographer Julio Codesal, after cropping it, you can gain more or less strength depending on what you want to communicate:
The original photograph of a small cabin has been framed so that the color of the sky can be appreciated and at the same time the small house and the ground have been used as an anchor that gives support and stability to the image. A relatively low horizon was used, in order to highlight the colors of the sky, the scene gives a feeling of solitude and peace very well transmitted in it.
Crop (1): If in the original frame you crop the photo in portrait orientation, the tonal weight of the sky and its clouds is even greater, so a good option would be to keep the sky as a key element, keeping the horizon. even lower than in the original photo. When cropping, try to preserve the essence of photography by evaluating the most interesting elements and placing them.
Crop (2): If you want to give even more visibility to the sky, such a crop can work very well, the horizon is positioned even lower, to stabilize the image using the ground almost like the edge of the image. . This is called the “basic horizon”. To counteract the weight of the cabin location so low on the left, this almost forces you to use a large part of the sky on your right. Again, an attempt was made to respect the main elements of the original scene.
Reframe (3): on this occasion, the frame was closed, largely preserving the original proportions, in this way the floor and the cabin take center stage in the scene. The horizon has been positioned as high as possible, inside. allowing the stage, to ignore much of the sky and focus attention on the cabin.
1-Fill in the frame
Even if you don’t notice it, when you’re photographing a subject or object, you wonder if I’m including part of the environment or not. This question is critical because the choice you make will have a lot of influence on the end result. The more it occupies part of the frame your subject, the more important it will be and you will also be able to capture it in all its splendor (in great detail). Now, perhaps the environment will photograph and the subject’s relationship with him reinforces the message he conveys, such as a photograph of a passerby and the city in the background as a frame.
Depending on the sensations you want to convey to the viewer, you must choose one or the other option: if the environment is important, you must work on your frame (use angles, lines, etc. ) to enhance the message or if you want the subject to dominate the whole scene, come closer, but keep in mind that the shape of the subject will influence the framing you are going to use. The decision is yours, go and take it!
Making the right decision won’t be a problem after reading the following articles:?16 ways to give prominence to your subjects? And after analyzing the photographs from the Weekly Challenge 53: Fill in the Frame.
2-Works the location of the items
The decision to place your subjects in one place or another within the frame is essential, whether you fill the frame with this or not, the place you assign to it should be pleasant for the viewer, that is, the position of the viewer must be in harmony. with the rest of the scene.
In photography, the arrangement of the elements present in a given scene in the frame is called a ‘photographic composition’. Artistic compositions, whether in painting or photography, are based on mathematical rules, proportions and methods that are ‘pleasant’ to the eye. These rules will help you direct the viewer’s gaze towards the points of the frame that, by visual instinct, are of greater interest and that if you know how to exploit them, you will go from the simple photo to the capture of an excellent photo. .
If you want to become a master in this field, be sure to read ‘9 tips and tricks to improve your photographic composition’. But as they say there, “You have to break the rules,” so once you master them, don’t worry. fear, breaking them is also an art.
3-Divide the frame
When you organize the elements in the frame, you have endless possibilities, however much you can think, even if not all of them are so interesting and attractive to the viewer.
The most interesting divisions within the framework are those that allow a well-defined relationship between them, these divisions of the framework refer to the proportion that each element occupies in the frame and how they should be located to achieve the greatest visual impact but without breaking the frame. harmony of photography.
Don’t worry, you should not buy a square and a compass to take your photos, you just need to train your look to get acquainted with the different proportions that you can use to take your photos. Some of the best known proportions are:
? Golden Number: This relationship is a guide that will allow you to match the elements in a very harmonious and visually pleasing way. This type of proportion, being permanently present in nature, will allow you to obtain very natural photographs that generate “comfort”. . in your viewers. If you didn’t know, don’t worry, consent or not, you compose your photos constantly using these proportions because it’s very intuitive and natural.
? Rule of thirds: this rule is one of the most basic rules for organizing elements in your frames, it consists of dividing the frame into three equal thirds horizontally and vertically, in this way, at the intersections of the lines, 4 imaginary points form, which are the highlights of interest within a photograph. As you can see, the center, although it is the obvious place where an element would be placed in the frame, is not one of the most interesting points for the view in the frame.
4- Find the horizon in the frame
The position of the horizon line in the frame is more important than you imagine, depending on the height you assign it, a photograph can convey a particular feeling depending on the other elements present in the scene. from the sky) will give more importance and weight to everything below, and conversely, a horizon line in a lower position will give a greater sense of stability. , does it function as a basis?and balances the frame.
In any case, the exact position of the horizon depends on many other factors such as: the balance of the photograph according to the brightness and colors of the sky (see example of the clipping point), the attractiveness of the sky on the ground, the total dynamics of the scene thanks to the clouds and its shapes, the contrast, the elements of the foreground Etc. It all depends on the circumstances of the photograph, the message you want to convey and, above all, your personal tastes.
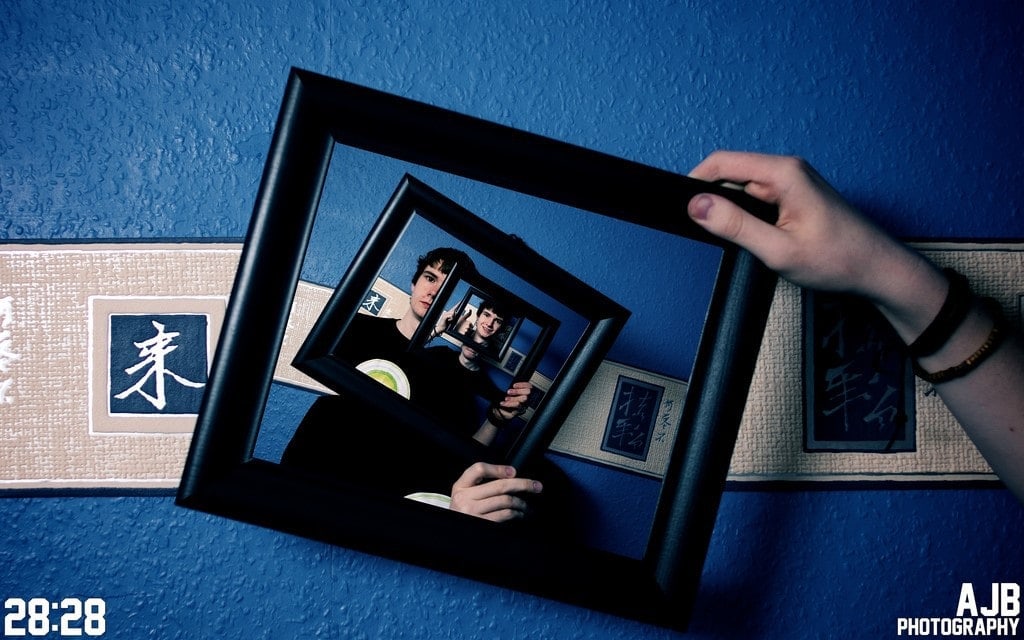
5- Table inside a box
There is a rule in photography that almost ensures success: “the framing in the frames”, that is, not only enjoy the edges of the photo, but also the interior, but frame another scene. , it will create a visually appealing internal framework that will give the viewer a sense of organization, stability, order and control. Does this new limit prevent the image?Reach? At the edges of the outer boundary (photo). This new frame will focus the viewer’s gaze even more on what it contains.
What are you waiting for to go out and get the most out of your frames? If you liked the article, do not hesitate to comment and share it! Thank you!