Welcome to the wonderful world of asphotography. Planning, patience and perseverance are the slogans. Constant obstacles, bad weather and weather to landslides and equipment failures, make the search very frustrating, but in the end, after all the failures, when you get your asphotography, it becomes one of the most rewarding forms of photography that exist.
This is a general guide that will allow you to get wonderful images in asphotography. There are many additional techniques, including tracking, stacking, and whiteboard extraction workflows.
- In this article.
- We’ll cover the main aspects of successful asphotography and how you can apply this concept to your professional photography.
There are several types of asphotography, including
Deep space images taken with an object telescope in addition to our own solar system. These are the amazing images you see from distant galaxies and nebulae and it’s the most technical and difficult form of asphotography.
The solar system are images of the planets, moons and sun of our own solar system. Again, images are photographed primarily with telescopes, but a supertele lens on a DSLR camera can also give you a good result.
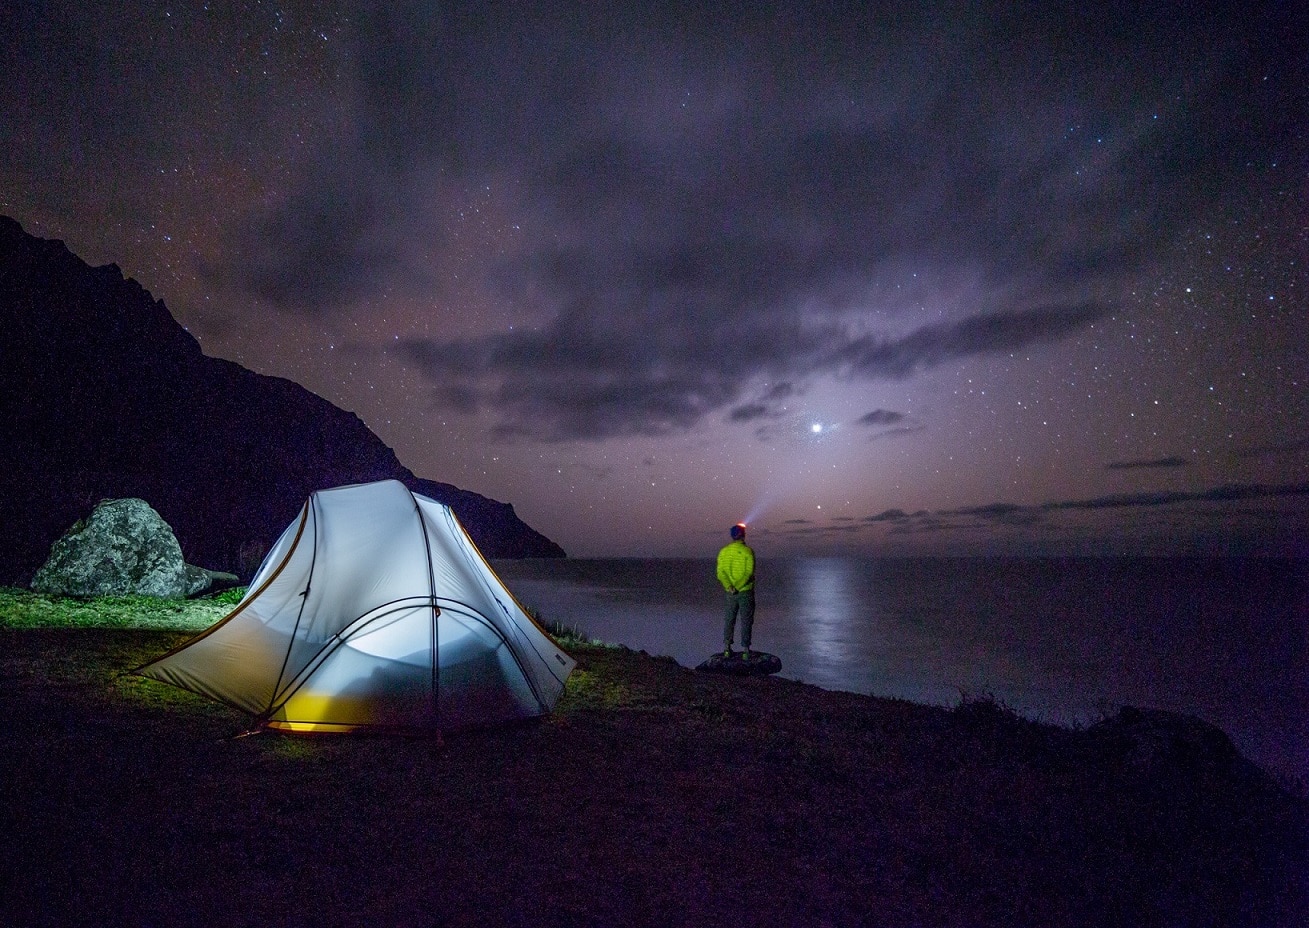
Wide-field astrophotography: This is the asphotography taken with a DSLR camera and a wide field-of-view lens. These are images that include a starry sky or star stripes over a landscape. This is the most accessible form of asphotography and the type that knows it in this article.
Astrophotography Time lapse?it’s just an extension of the astrophotograph in the field. The only difference is that you take a lot of exposures over time and then combine the images to create a time-lapse video. The same technique can be used to create an escape image of the star. .
In the modern era of digital photography, almost everyone can access asphotography, but at least the equipment is easy to get, all you need is a modern DSLR camera, with good capabilities for low-light images, a fast lens and a sturdy tripod.
You can also add additional accessories to the kit that will allow you to do a little more, such as an intervalometer, that will allow you to make a time lapse and escape the star thanks to the astrophotograph.
Of course, you can go out and accumulate many other specialized equipment, such as equatorial mounts that track sky rotation and robotic camera mounts to capture large panoramic images, but for now, let’s focus on the basics.
DSLR camera? Ideally, you should have a digital camera with a full-size sensor, as you need to have the maximum sensor area to capture as much information as possible, but you can also get reasonable results with cult sensor cameras, which fit your budget a little more than the more modern ones.
Lenses? When it comes to asphotography, a large aperture lens is essential to let in as much light as possible, ideally it would be a maximum aperture of at least f/2. 8, but you can still get a good result with f/4. 0.
Unfortunately, the larger the aperture, the more expensive the lens, but you can get good, much cheaper lenses by choosing lesser-known brands. The great thing about astrophotography is that it only uses manual focus, so a lens with this feature will help you a lot.
Tripod? Believe it or not, a tripod is one of the most important equipment you can have for astrophotography. You need it to keep the camera stable and, most importantly, to keep your camera in the same position in case of a long time frame.
With any form of asphotography, you will face prolonged exposures. This means that to get the best results, you need to remove any movement or vibration from the camera. The most obvious way to do this is to mount the camera on a sturdy tripod.
But there are other problems that cause movement and vibration when using the camera. The first is that simply pressing the shutter can cause the camera to move, even if a sturdy tripod is used.
You probably won’t notice this movement in your astrophotographic images, but if you try to photograph the moon with a telephoto lens, even the smallest movement will be amplified and noticeable in your images. The best way to solve this problem is to use a trigger cable or set the camera’s automatic timer to capture the images 2 seconds after pressing the shutter.
When you go out and photograph the sky at night, you’ll be in a pretty dark place, unless you’re circling the city or during the full moon. Therefore, framing the asphotography will not be as easy as looking through the viewfinder, as it does during the day.
The best way to do this is to use your own eyes to find an area of the sky and landscape that you think will make a good composition and align the camera in that direction. Then you need to take some photos to see the end,result on the LCD screen on the back of the camera.
Central? It is essential to concentrate well on any type of photography, in asphotography this process is even more difficult due to the lack of light for the autofocus, in all forms of asphotography you will always photograph in manual focus mode and adjust the focus as close as possible to infinity.
This can be as simple as moving the focus ring on the infinity mark, which looks like an “8” on your lens, but know that in many lenses, this may not be accurate and, as a result, the stars will appear a little blurry when uploading images to the computer.
Some lenses don’t even have an infinity mark, to ensure accuracy, one method is to set their infinite focus during the day by focusing on a distant object with autofocus. You can then lock its focus by switching it to manual mode and pasting a piece of tape into the focus ring so it doesn’t move, leaving your camera infinitely focused for your asphotography.
However, it’s always a good idea to check your photography test with a 100% zoom on the camera’s LCD screen, just to make sure your stars are crisp and sharp. Another method is to use the live view on your camera and zoom in on the LCD to manually adjust the focus as close as possible, then find the brightest star in the sky and make small focus adjustments until the star appears.
Planning is one of the most important things in asophotography, you can engage in photography without any planning, but it’s always a good idea to know your locations in advance and plan what your photos will look like.
Location? You probably have a list of favorite places, but you can also find interesting new places. A great way to get to know the place and get there is using Google Maps or GPS.
Do you know where the stars are? Part of astrophoto planning is knowing what part of the sky you want to photograph and how it aligns with your composition. Our own planet rotates at 3,600 kilometers per hour and also travels through space at more than 240,000 kilometers per hour.
So, as you can imagine, the sky is constantly moving, the position of the stars and the Milky Way is constantly changing throughout the year, so it’s important that you know where the stars will be when you do asphyroticography.
There are apps for your phone that facilitate this planning, such as Starwalk, that will show the position of the stars, allowing you to plan a perfect photo of the Milky Way.
Photo of the moon? Again, are there some apps that will help you in this precise planning, one of which is called The Photographer?S Ephemeris (TPE). Or if you have an iPhone, you can use PhotoPills, accurately calculate the location of the moon.
With all forms of asphotography you will need to manually photograph in all your settings, the camera will not be able to correctly evaluate the automatic settings with the light available at the time of the photo, this will also give you consistency in your plans, see these definitions below, as well as the factors to consider for each one.
Exhibition? There are two main factors that control your exposure to asophotography, one is the shutter opening time or shutter speed, the other is the aperture, the combination of these two determines the amount of light that reaches the sensor to give it the final image. Astrophotography, you’ll have to deal with prolonged exposures as you photograph objects in the dark.
Shutter speed?is the time that the camera shutter is open to allow light to enter the sensor. In asphotography, we need a long shutter speed to allow enough light to enter the sensor. We also need to keep in mind that the longer you leave the shutter open, the more stars or stripes will be filtered in the images.
This can be a desired effect if you want to capture the star leaks, but generally want to avoid them in your astrophotograph, so it is important to know how long you can expose before leaks begin to appear, this will vary depending on the focal length you use, the longer the focal length, the shorter the exposure time you will need.
Aperture is the mechanism of your lens that controls the amount of light that reaches the camera sensor when it is opened and closed. You can think of it as the pupil of your eye, it expands in the dark allowing more light to reach your retina, but contracts in the presence of excessive light to let less light pass, your camera’s diaphragm works in a similar way.
The aperture is defined as stops, in asphotography we need so much light to pass through the lens until we reach the sensor, so it will be necessary to use the maximum aperture of your lens to get better results with the asphotography.
A lens with a maximum aperture of f/2. 8 will suffice for asphotography, however, if you are photographing something brighter like the moon, for example, and want to see details on its surface, you can choose a lens with a lower aperture, something like f/9.
Me like that? Modern DSLR cameras are capable of performing high ISO configurations, making it ideal for asphotography, setting a high ISO on your camera is able to capture more details than our own eyes can see.
ISO in digital photography measures the sensitivity of your camera’s image sensor. The higher the ISO, the more sensitive or amplified your image sensor will be relative to light. The only problem with high ISO levels is that the higher it is, the more digital noise. will appear in your image, but this can be corrected to some extent by reducing noise during post-processing.
While shooting in the dark, we want to be able to take pictures with the highest possible ISO without generating too much noise in the image, but we won’t always control noise reduction. Depending on the camera you’re using, the maximum ISO settings and noise may vary, but it’s worth trying it out to see how far you can push your ISO without degrading your asphotography too much.
White balance – this is the process of removing unwanted colors, neutralizing the white in your asphotography. This value varies depending on the lighting sources, so it is important to manually set this value for astrophotography.
Some people define white balance for one of their camera presets, such as daylight, for example, and then neutralize their post-production white balance. This may be possible even when shooting in RAW, but if you are taking jpegs, not recommended for asphotography, then you should get your white balance as accurate as possible and it should be adjusted manually.
For asphotography, the white balance can vary between 3200k and 4800k depending on lighting conditions. You can also use the predefined tungsten white balance, which is approximately 3200K.
With asphotography, however spectacular the night sky is, you have to work on the composition of the whole photo to get the best result, especially if you want to end up with an image that stands out among the others. anyone can point a camera and take a good picture of the night sky, but the difference between a good image and a good image is its composition.
Composition is something that can come naturally to people who have an artistic eye, but others have a hard time understanding it and do not get a good composition in any way, even when it is right in front of them.
Fortunately, there are simple rules to help those who can’t easily see a good composition and if you are aware and plan your shots around these rules, the composition can begin to reach you more naturally.
These are some of these rules
The rule of thirds is a rule based on the division of an image into third parties, both vertically and horizontally, the idea is to place your point of interest at one of the intersections of this third to give it a more pleasant composition.
Points of Interest: An image without a point of interest will not capture the viewer’s attention for long. It could be something as simple as a tree in the foreground and the night sky in the background, or the Milky Way in the background with a mountainous landscape. landscape.
Your right horizon? Unless you deliberately lower a Dutch slope, it is very important in any landscape photograph to make sure your horizon is straight. This same rule applies to asphotography whenever there is a horizon in your photo.
You would probably do your own tutorial on post-processing in asphotography, really each photographer has their own techniques and tricks to improve their final result, however, there are some points where we can agree on digital processing in asphotography.
Before digital cameras, photos were processed in a dark room with chemicals and photographic paper; Now, in the digital age, processing is done on a computer using specific software and with a few clicks it is already possible.
It’s certainly not exactly the same type of treatment, but you can also use processing techniques directly on the camera if you want to escape the long hours in front of a computer, or choose software like Photoshop, Lightroom and Aperture to give you much more freedom with your processing techniques, especially when using RAW image format.
This is ideal for asphotography, as it can give you a lot of control over your image, but it can also be a double-edged sword, after all, if you abuse this resource too much, it can have a totally opposite result to yours. Expected.
In asphotography, keeping your images as natural as possible and treating them as little as possible is the best way to achieve spectacular results. At this point, you should also make sure that your white balance is relatively neutral and not too light or too dark. For the non-sophisticated eye, you may not realize that this is a problem, but it is important to produce quality astrophotographic images.
It all comes down to good camera techniques, so you really have to do everything before taking your photos, so you have the least work and digital retouching in your asphotography. But, as I said before, the treatment is very personal and the style in which the image will be processed will vary from photographer to photographer. Here are just a few tips to make your asphotography as natural as possible.
As you’ve seen, you don’t need expensive photographic equipment to enter the astrophotographic scenario, you can use most of the tools you already use in your professional work.
Much of the success of your astrophotograph is also defined at the time of photography, you can even use post-processing, but this will have little effect if you plan and execute your asphotography in the basic rules of success, including: the rule of thirds, points of interest and horizon in a straight line.
Similarly, because astrophotography involves capturing low-light images, worrying about camera stabilization and proper framing are key points for wonderful astrophotographic images.
Of course, you can achieve higher levels of asphotography with higher investments and more resource-rich equipment, in fact, don’t hesitate to improve your techniques at all times.
As for the basic tips, I think this article has kept its promises, I hope it has helped you and do not hesitate to leave your comment, suggestion and point of view in the field below.